
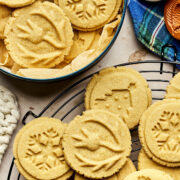
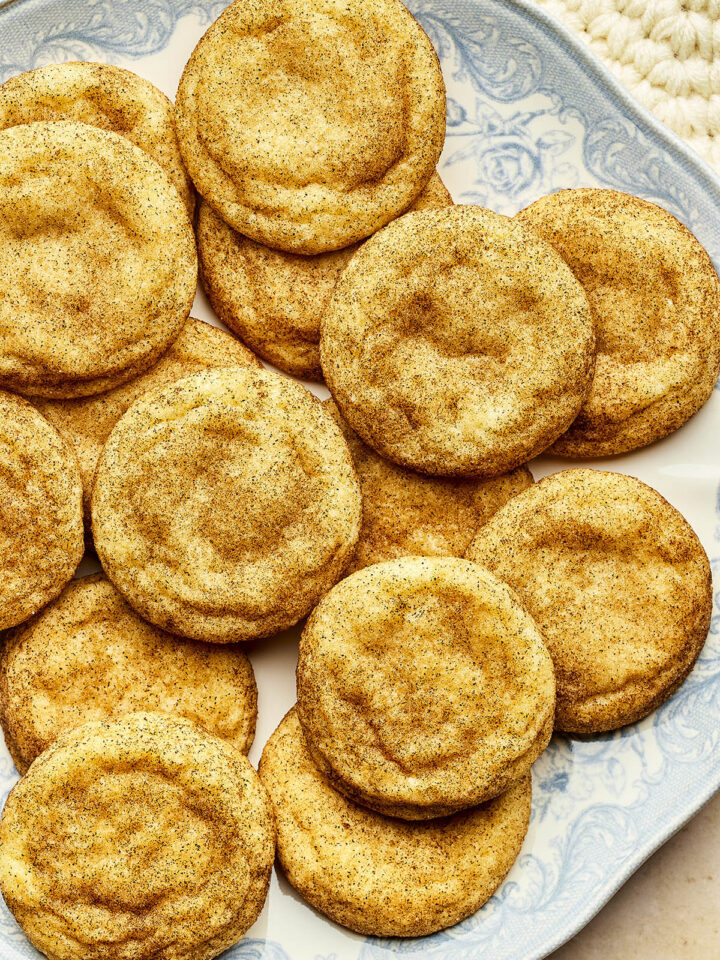
Brown Sugar Shortbread Cookies (Stamped or Plain)
I first learned to make brown sugar shortbread cookies from a Scottish family recipe. Over the years, I’ve refined the recipe and the technique so the cookies release cleanly from cookie stamps, hold their stamped shape, and bake evenly. If you don’t have cookie stamps, the dough still bakes up beautifully when pressed with the bottom of a drinking glass.

“I’ve never made shortbread before, these are so lightly sweet, crunchy and easy. Thank you, a keeper, I’m impressed!” — Mary
I love to thrift. A number of years ago, I found two handmade blue and white ceramic discs with a flower carved on the bottom and a small handle on top. I had no clue what they were, but I knew they were unique and interesting.
A friend’s husband noticed them on my Instagram stories one day and reached out to tell me they were Scottish shortbread cookie stamps, and that the flower, which I had thought was a tulip, was actually a Scottish thistle. After a few messages back and forth, we agreed on a trade. I’d give him one of the two stamps, and he’d give me his Scottish mother’s brown sugar shortbread recipe, which I’m now sharing with you.
I find brown sugar lends a warmer flavour than traditional white granulated sugar, and as the cookies bake, you will smell that gorgeous caramelization throughout your house. The dough doesn’t need to be chilled, the cookies don’t spread much, and with a deeply carved stamp, they hold their shape beautifully. They’re crisp and packable, perfect for cookie tins, and over the years have become my own family’s favourite Christmas cookie.
Jump to:

A Note From Kelly
This is my family’s number one favourite Christmas cookie recipe. It’s consistent and easy to work with, and the dough always behaves the same way, which is a relief when you’re in the throes of the holiday season. My family now not only expects them, but starts asking about them long before December.
How to Use Cookie Stamps for This Recipe
Using cookie stamps with this shortbread dough is simple because the dough holds detail cleanly without chilling. Below are the four stamps shown in the photos, including one drinking glass, and how each one behaves with this recipe.


A. Scottish Thistle Ceramic Stamp
This handmade ceramic stamp has a deep, concave carving that presses firmly into the dough and creates a very defined pattern once baked. It was one of my thrifted finds, and the design holds especially well because the dough barely spreads. The cookies come out crisp, clear, and evenly shaped every time.
B. Drinking Glass
I used a crystal drinking glass with a simple carved pattern on its flat base, and I was surprised by how well it behaved. Even though it isn’t a dedicated cookie stamp, the design pressed evenly into the dough and held its shape in the oven. A glass with a decorative or plain bottom is a reliable option if you don’t own cookie stamps.
C. Terracotta Pine Cone Cookie Stamp
This terracotta stamp isn’t as deeply carved as the thistle design, but it still produces a clear impression after baking. The pine cone has a softer edge and a slightly more rustic look, which suits this dough well. It was another thrifted find, however, Birdsall-Worthington Pottery Ltd, located in Mahone Bay, Nova Scotia, makes very similar terracotta cookie stamps.
D. Interchangeable Silicone Stamps with Wood Handle
These silicone holiday stamps, which I bought at Homesense, have deep, outward-facing designs that press straight into the dough and release easily. The depth of the carving helps the details stay sharp, even the letters, which I was a bit surprised by. These finished cookies have the cleanest, most graphic look of all the stamps.
Ingredients For Brown Sugar Shortbread Cookies

Ingredient Notes
- Butter: I use salted butter for all of my recipes. Make sure it is soft at room temperature so it creams properly with the sugar.
- Salt: I use table salt for all of my recipes.
- Sugar (Brown): Look for dark brown sugar, sometimes called old-fashioned brown sugar. Do not use light brown sugar or demerara sugar.
- Sugar (Granulated): Standard white sugar is used for rolling the dough balls before stamping to prevent sticking.
- Vanilla Extract: Use any vanilla you like or have on hand.
It’s important to note that when making substitutions in recipes, the texture and flavour may be slightly different. However, these substitutes are the best options for changing the original recipe.
Ingredient Substitutions
- Butter: You can use unsalted butter and add an extra ¼ teaspoon of table salt to the dough.
- Salt: You can use fine sea salt in the same amount.
- Vanilla Extract: You can use ½ teaspoon of almond extract in place of 1 teaspoon of vanilla extract.
Recipe Variations
Try any of the following for a twist on this brown sugar shortbread recipe:
- Cardamom (Ground): ½ teaspoon, added to the flour
- Cinnamon (Ground): 1 teaspoon, added to the flour
- Maple Extract: ½ teaspoon, added with the vanilla extract
- Nuts: ¼ cup almonds, hazelnuts, or pecans, toasted and finely chopped, stirred into the dough with the flour
- Orange Zest: Up to 1 tablespoon, mixed into the butter and sugar at the start
- Rosemary: 1 teaspoon, fresh, finely chopped, mixed in with the flour
Use the JUMP TO RECIPE button at the top of this post, or scroll to the bottom to see the PRINTABLE recipe card with ingredient measurements and complete instructions.
How To Make Brown Sugar Shortbread Cookies
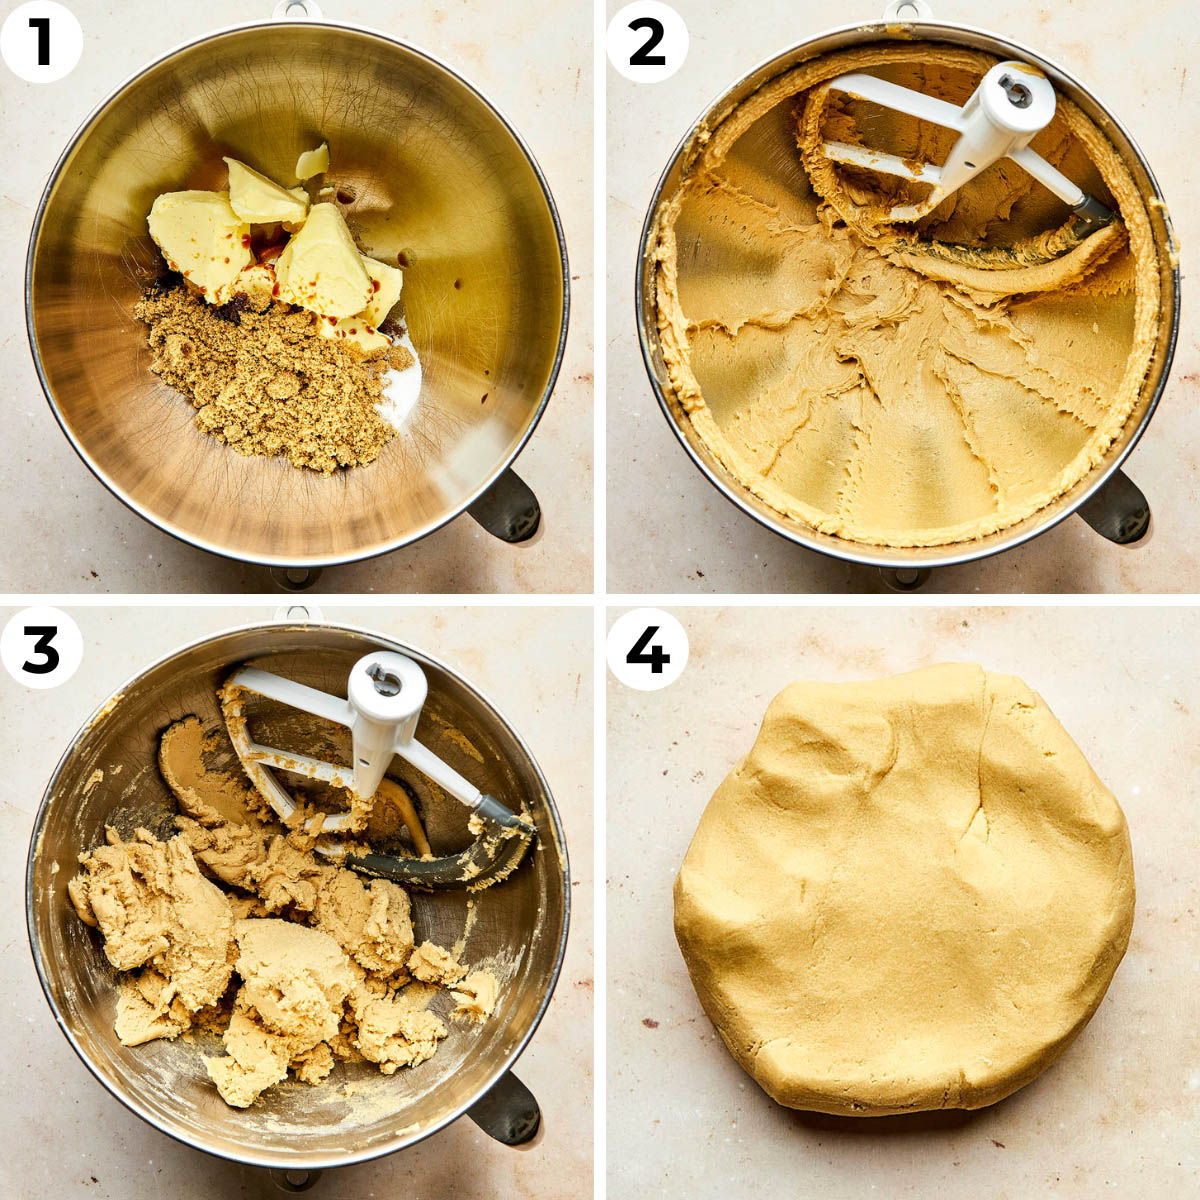
STEP 1: Place the butter, brown sugar, vanilla, and salt in a large mixing bowl.
STEP 2: Mix at medium-high speed for 5 minutes, scraping down the sides and bottom of the bowl halfway through.
STEP 3: Add the flour, then mix on low speed until a soft dough forms in large clumps.
STEP 4: Transfer the dough to a clean work surface and knead it by hand until smooth.
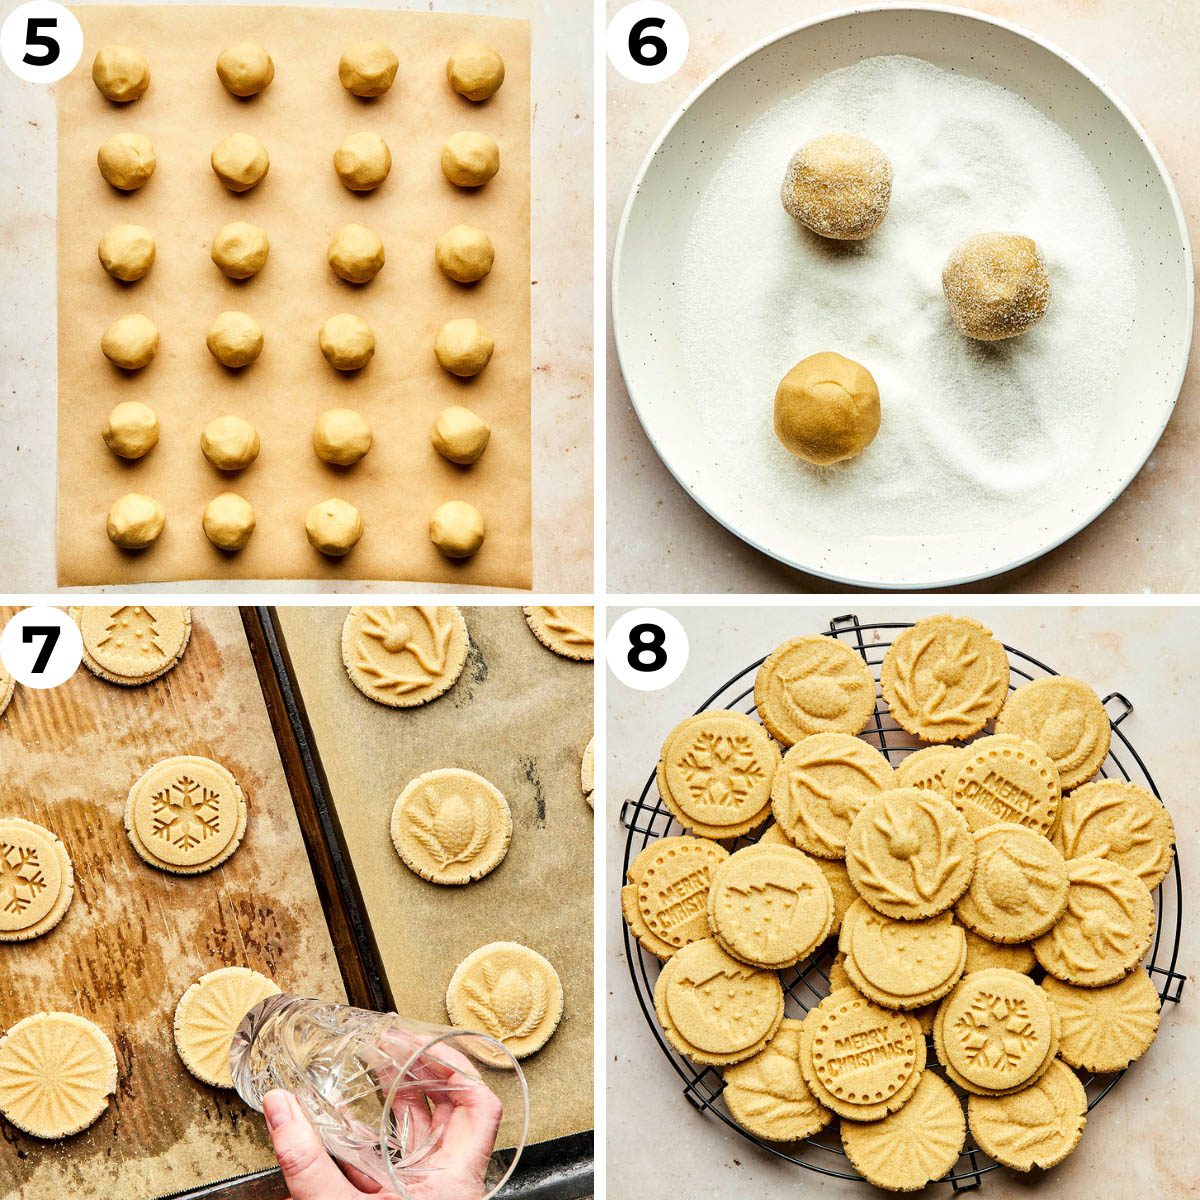
STEP 5: Divide the dough into 24 equal portions, and roll each one into a smooth ball between your hands.
STEP 6: Roll the cookie dough balls in granulated sugar to coat.
STEP 7: Set the balls on two prepared baking sheets. Press each dough ball firmly in the centre using a cookie stamp or the flat bottom of a drinking glass.
STEP 8: Bake the cookies until the edges are set and lightly golden. Transfer the cookies to a wire rack to cool completely before storing or gifting.
Kelly’s Top Tips
- I beat the butter and brown sugar for five minutes so the mixture becomes light and creamy, which helps the dough come together smoothly and hold a clean stamped shape.
- Cracking along the edges of the cookies when stamping is a sign that you have the correct butter-to-flour ratio. It’s a good thing.
- Let the cookies cool fully before storing because they firm up as they cool and pack more neatly once set.
Recipe Notes
- For detailed ingredient notes, substitution tips, variations, and step-by-step photos, scroll through the full recipe post.
- Use a digital kitchen scale for precise measurements and an oven thermometer to confirm your oven is heating correctly.
- To switch to gram measurements, click “Metric grams” in the ingredients section of the recipe card.
- The dough is traditionally mixed by hand and feels quite dry at first. If you are not using a mixer, it may seem like the flour will not incorporate, but keep going, and it will become soft and pliable.
- The cookies bake well without chilling. If your kitchen is warm or you prefer even sharper stamped details, you can freeze the stamped cookies for 20 to 30 minutes before baking.
- Rolling the dough balls in sugar is optional, but it helps prevent the stamp from sticking.
- Stamped cookies made with a 2 to 2 ¼ inch (5 to 5.5 cm) stamp are usually about ¼ inch thick. Avoid stamping or pressing the dough balls beyond 2 to 2 ¼ inches (5 to 5.5 cm). Larger stamps create thinner cookies that bake more quickly
Storage
- Store the cookies in an airtight container at room temperature for up to one week. You can also freeze baked cookies in a freezer-safe container or bag for up to two months.
More Recipes Like Brown Sugar Shortbread Cookies
Printable Recipe Card
Brown Sugar Shortbread Cookies
Equipment
- Measuring cups and spoon or digital kitchen scale
- Two baking sheets
- Parchment paper
- Electric mixer and mixing bowl
- Cookie stamp(s) (about 2 to 2 ¼ inches) or drinking glass
- Wire racks
Ingredients US cups or click for Metric grams
- 1 cup salted butter (room temperature to soft)
- ½ cup brown sugar (packed)
- 1 teaspoon vanilla extract
- ½ teaspoon table salt
- 2 cups all-purpose flour
- 3 tablespoons granulated sugar
Instructions
- Preheat the oven to 325ºF (165ºC) and line two baking sheets with parchment paper. Set aside.
- Beat the butter, brown sugar, vanilla, and salt with an electric mixer set to medium high speed for 5 minutes, scraping down the sides and bottom of the bowl halfway through.
- Scrape down the bowl again and add the flour, then mix on low speed until a soft dough forms in large clumps.
- Transfer the dough to a clean work surface and knead it by hand about 20 times until smooth.
- Divide the dough into 24 equal portions, about 27 g each, and roll each one into a smooth ball between your hands.
- Place the granulated sugar in a small bowl and roll each dough ball in the sugar to coat, then set the balls on the prepared baking sheets, 12 per sheet, spaced about 2 inches (5 cm) apart.
- Press each dough ball firmly in the centre using a cookie stamp about 2 to 2 ¼ inches (5 to 5.5 cm) wide, or use the flat bottom of a drinking glass the same size, pressing until the dough just reaches the edge of the stamp or glass.
- Bake the cookies for 22 to 24 minutes, until the edges are set and lightly golden. Transfer the cookies to wire racks to cool completely before storing or gifting.
Notes
- For detailed ingredient notes, substitution tips, variations, and step-by-step photos, scroll through the full recipe post.
- Use a digital kitchen scale for precise measurements and an oven thermometer to confirm your oven is heating correctly. To switch to gram measurements, click “Metric grams” in the ingredients section of the recipe card.
- The dough is traditionally mixed by hand and feels quite dry at first. If you are not using a mixer, it may seem like the flour will not incorporate, but keep going, and it will become soft and pliable.
- The cookies bake well without chilling. If your kitchen is warm or you prefer even sharper stamped details, you can freeze the stamped cookies for 20 to 30 minutes before baking.
- Rolling the dough balls in sugar is optional, but it helps prevent the stamp from sticking.
- Stamped cookies made with a 2 to 2 ¼ inch (5 to 5.5 cm) stamp are usually about ¼ inch thick. Avoid stamping or pressing the dough balls beyond 2 to 2 ¼ inches (5 to 5.5 cm). Larger stamps create thinner cookies that bake more quickly.
- Store the cookies in an airtight container at room temperature for up to one week. You can also freeze baked cookies in an airtight freezer-safe container or bag for up to two months.
Nutrition
Nutrition information is an estimate and is provided as a courtesy. For precise nutritional data, please calculate it independently using your preferred nutrition calculator.


More Dessert Recipes


Kelly Neil is a recipe developer, food photographer, and lifelong Nova Scotian building a sense of home and identity through recipes. She lives in her hometown of Dartmouth with her partner, Chris, their daughter, Elodie, and their little dog, Skipper.
This post may contain affiliate links. As an Amazon Associate, I may earn a small commission if you buy something through one of them at no extra cost to you. I only share products I use myself and genuinely recommend.


Thanks for the recipe! I whipped it up today, and it came together so quickly. It’s easily the best shortbread cookie I’ve ever made. I was looking for a brown sugar shortbread recipe since I’d run out of white sugar but had plenty of brown sugar on hand, and I’m so glad I found this one. It turned out perfect for a raspberry-filled macadamia nut shortbread topped with a white chocolate drizzle.
I’m originally from NS. It’s such a delight to have found your recipes. A taste of home. These brown sugar shortbread cooked up so perfectly. I am celiac. I use Bob’s Red Mill 1 for 1 Gluten free flour. It’s my favourite Gluten free flour. They are probably a touch drier or powdery than regular flour but I’ve been celiac my whole life and for me taste and texture are perfect. I used a disk to press them down. Love the cookies.
One of the best Christmas cookies I’ve ever made (husband agreed)! Easy to follow recipe, beautiful and most importantly they taste amazing!
I made these cookies today. They are the bomb! I made them exactly per the recipe except I did not knead them. I mixed with my 7 speed hand mixer until the batter almost formed a ball. I shaped it into a ball and used my cookie scoop which measures just barely over a tablespoon to make the balls. I used a small glass measuring cup to press them down to about 1/4 inch thick. I got actually 25 cookies. I used a toothpick to make the traditional “holes” in them. In my oven at 325 degrees, they took 23 minutes to bake to perfection. They came out crispy and light around the edges and a little more dense in the center but not hard. Love the sugar on them. These will be my go-to shortbread cookies now. My favorite cookie for pairing with a hot cup of tea. Thank you Kelly!